Thursday, July 14, 2011

Handy Bag Organizer - My latest project!

Hi friends!

I'm posting my very first pattern here on my blog.  It is based on a popular pattern I saw online but then again, I made a lot of customizations to make this truly unique and one of my own.

I'm so proud of my very first creation which I spent hours conceptualizing.  Thanks to one of my bosom friends, Ditas, who spawned this great idea.  Here's how the finished product looks...


The bag has a lot of pockets both inside and outside.  The inside portion can carry your cellphone and other more important gadgets.  The outer pockets have ample space for your make-up necessities.  Here's how it looks inside...


This item is made to order which I can send to you in 2 weeks.  The price is P150 and the buyer will shoulder shipping charges (add P180 for LBC).  Sorry, I only ship locally (Philippines).

Interested in the pattern?  Just send payment ($3.50) through paypal on the button provided and email me at lycheemint@gmail.com so I can send you the link.

Will be making more posts soon :)

Saturday, July 9, 2011

Bags Galore!

This is the 2nd installment of my post pertaining to my stitched creations.  This time, however, there are only bags, bags and more bags!  They're just my favorite crochet/knitting pieces.

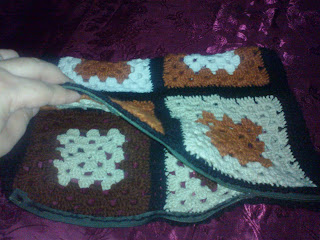
It started when I was able to make something out of the 6 granny squares which I created eons ago.  Come to think of it, I can't even remember how long ago that was...  But I didn't know what to do with them then, and I also didn't know a good way of joining them.  One day in May, a spark of inspiration came to me and I was able to come up with the idea of finally creating my laptop cozy out of my 6 granny squares.  I had already started on a laptop cozy using a different pattern and thread, which I thought I would be able to finish, but sad to say, it's now stored among my scrap crochet pieces :(

Here's how my laptop cozy looks like...


Here's how it looks on the other side...


I added a zipper and here's how it looks when I open the closure...


So you see, I was able to create something practical out of the squares I made before.  Nice eh?

If you're interested in creating Granny Squares, here's the link.  I used the Flat Braid method in joining them.  Here's the YouTube tutorial for learning the Flat Braid method.  I particularly liked this method since the joining between the squares is undetectable, unlike the sewn method or the single crochet method.

After a customized project, I gained more confidence in creating a real bag for myself.  Here's the bag which I created next.


This one is based on the pattern "Save the Earth Bag" on this link.  The sample shown on this page is a solid color in cream/off-white.


What's good about this bag is that it is quite stretchy and it can hold a lot of stuff.  I used 3 shades of gray in crocheting this bag because I noticed that I have a lot of stock yarns in this shade.  I did this bag in 2 days tops because even if it looks complicated, it's actually easy to make but still as pretty :)

Next, I came upon a different pattern which is more of a short shoulder bag or what they call here in the Philippines as "kili-kili" or underarm bag (funny term huh?) - it's one which when you put on your shoulders will stay close to the body particularly the underarm of the one carrying it.  Here's how it turned out...

     
Nice one too huh?  I used it yesterday and the only thing missing here is a good closure.  This crocheted pattern has no closure indicated so I am again challenged to think of something to close the bag.  Am still waiting for that spark of inspiration which always comes to me just at the right time.


It's in pure black.  I was also thinking of what color to combine it with but then I finally decided against using any of my brightly colored yarns.  I just thought that it would be nice to use different colors which I plan to weave through the double crochets on the middle portion of the bag.  But then again, the idea hasn't been fully formed in my mind yet so I will just post updates on this later on.

I'll be seeing some friends next month too so I tried to look for pouch bags which can be used as make-up bags, or other toiletries, or other things.  You know the saying - "A woman can't have too many bags" - so I tried to look for cute little bags which would look great inside a woman's larger bag.  Here's the pattern I found, and here's the bag I created.


I did this pouch using only my scrap threads, and yet it still looks cute right?  You can of course create your own customized pouch using a different color combination.

So these are my creations so far.  I have one in progress and maybe I will make a sneak peek post tomorrow.

Catch you later~


My Stitched Creations

Hi friends!

It's just the 2nd day of my blog and I'm here again.  As promised I'm posting the creations I've done during the past few weeks and months - some I've done way back, but most I just did several weeks ago.

Sad to say, I cannot post a lot of the links which I used for these creations since I just had my laptop re-formatted 2 weeks ago and I remember I wasn't able to save my bookmarks (sigh).  Anyway, I did most of these as gifts to family, relatives and friends.  However, venturing into a lucrative income-generating hobby is not really such a bad idea :)

Brace yourself...


Looks yummy right?  Look again...This is not an edible cookie since this is a knitted oreo cookie :D  Here's a link to the pattern if you're interested to do it yourself...


This one is a cellphone cozy which I made for my Nokia E5.  I made this particularly thick because I'm one who loves pouches and I am fond of just pulling my things without much regard to the other contents of my bag.  This would protect my phone from unwanted scratches, bumps and all.  Unfortunately, I can't find the link to this at this time so I'd have to come back to this later on...  (Got the link, real quick comeback hah! :D) Nevertheless, there are a lot of cellphone cozy patterns available online so it's not really difficult to find one that will suit your taste.

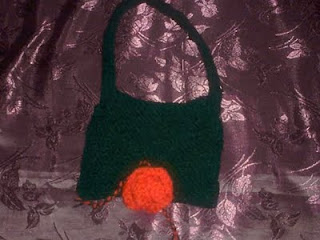
Below is a cute little black bag which I made for my 7-year-old niece.  She's fond of bags like me, so I made one as cute as her with a rose flower accent for the closure.  The online pattern did not have any instruction for the bag closure, so I customized my own design.  I made a small string which I attached to the bag flap.  All my niece has to do is to wind the string around the flower - simple but effective right?


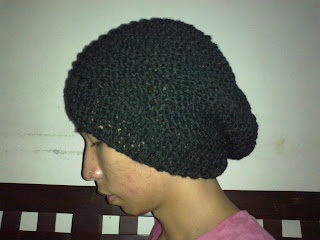
The images below are for a knitted beanie which I made for my son.  I used garter stitch to add texture to the hat.  I also extended the length of this beanie to make it a bit slouchy at the back.


Now here's a simple ribbed headband which I created for my niece again.  This one is a cotton headband so that it won't be irritating to the scalp since she's still quite young.


Now, since I wasn't sure of her head measurement, and I wanted to play it safe, I created another headband, this time in white soft acrylic yarn, which she can also use during her ballet classes.  Here's how it looks...


After creating these headbands for my niece, I came up with another project idea for my youngest son who didn't want to have his haircut during the summer break.  The image below was made with black acrylic yarn with measurements fit for my son to push away the hair locks from his face while he played on the pc...  I call it "Locks Tamer for Boys"...


  I have to upload the other pics yet so this will definitely have a Part 2...  See you next time :)

Friday, July 8, 2011

A New Blog for Crochet and Knitting Fans!

Hi everyone!  I am an online worker from the Philippines and am proud to be called a "granny" because of my love for crocheted 'granny squares' lol.

I've created this blog for those who - despite the onslaught of technology, media and a lot of other leisurely pursuits - still have the time to hold the hook or the knitting needle and bask in the relaxing effect of being able to create something out of those furry, fuzzy balls :)

I just came from Rosario, Pasig City this afternoon to buy some yarn  which are sold by the kilo at this place.  It was the 2nd time I bought from this location since my yarn stocks were running low specifically the black one.  I also got to learn about these stores online and I can say that I am happy to have found good quality thread at a fraction of the price they are sold in the malls or handicraft stores.

I forgot to get the name of the store I went to but this is the first leftmost store on the block which was selling yarn threads.  The yarn sellers can be reached after crossing the first overpass from the San Juan bridge, or the first bridge which the Rosario jeepney crosses.

The  bad thing about this is that it was raining when my son and I were there and I was currently busy picking out  my color preferences from the stocks available.  Because of this I remembered what I read somewhere online - to make INSTANT traffic in Manila, Philippines, just add water :)

It was disappointing not being able to find the black yarn which I badly needed since only 1 ball was available; the store owner who was very accommodating said that they have not been able to wind new balls for that specific color and someone else came ahead of us who was able to buy almost all the black yarn on their stocks for that day.  Anyway, just wanted to mention that the current prices at the store which I went to -
Acrylic yarn = 305 pesos per kilo
Regular Yarn = 270 pesos per kilo
Cotton Yarn/Thread = 170 pesos per kilo

The difference between the Acrylic and the Regular yarn is that the Acrylic has a thinner strand, usually 4 strands are needed to come up with the Regular yarn.  The Acrylic yarn also has a lot of available colors, but of course, this will require twice the amount of thread to be able to create your project.  On the other hand, the cotton yarn has heavier weight compared to the two, but is definitely cooler on the skin, and is more advisable to use for knit/crochet creations in the Philippines, especially those which will be worn and placed near the skin.

I have been able to knit/crochet a lot of projects during the past weeks due to the lull in my online tasks - just a way of being more productive and having more practice at stitching.  So far, I've been able to come up with some cute and practical creations which I will be posting in a bit.  Kudos to a lot of sites which have been great sources for my patterns.  I will also be posting their sites here in the coming weeks, just give me a bit more time and I will try to squeeze everything in okay?

In the meantime, here are images of my latest yarn purchases.


These are the cotton yarns I purchased which reached 1.2 kgs.  Below are the regular yarns I bought which reached half a kilo.


Here are my acrylic threads which reached 0.7 kgs.  Notice the bright colors.  The black thread is the only ball remaining.


As you can see, these threads are generic or unbranded, hence the low price, but when I asked the store owner, she said that they were from Manila Bay, I think I remember she said the brand is J&P Coats.

And here below is the Red Heart brand which I bought from Carolina's Lace in SM Megamall since, as I said, I badly needed the black yarn...


The price is a whopping P13 per pc.  Do the math... All the thread in this image totalled P234.  By now, I'm sure you can see the GLARING price difference.

You can expect to read more in the coming days...